Class: Alcohol Ink Ornaments

  • Glass Ornaments – Any size round or oval glass ornaments. For class we will use appx. 3 in round ornaments.
  • Alcohol InkPinata Alcohol inks are a little richer, thicker and more vibrant. Ranger Alcohol Inks by Tim Holtz have a large variety of colors which include standard colors, metallics and pearlescent options. Art Supply Warehouse in Westminster carry Pinata, the Ranger inks can be found at Hobby Lobby, Michael’s and you can find them all on Amazon.
  • Liquitex Medium/Mod Podge (Mod Podge Matte or Mod Podge Gloss is fine) I dilute mine by 25% which allows it to flow inside the ball better. Used to apply a thin layer inside the ball once you have completed your alcohol inking. It gives the glitter something to stick to.
  • White Acrylic Paint – The liquid style works the best. I dilute it slightly to allow it to flow inside the ball better, approximately 10-20%. It is poured into the ball to give the back of your artwork an opaque backing which brings out your design more. (Other colors could be used)
  • Glitter – A variety of colors and sizes. Pouring fine and extra fine glitter into squeeze bottles makes it easier to put into the ball.
  • Small Funnel – Used to pour glitter into the balls.
  • Compressed Air – Compressed air used for cleaning keyboards works best. You can also use manual hand air blower like used with cameras.
  • Gloves, Apron, Table Covering and Paper Towels – Great to have on hand to protect your hands, working space and your clothes.
  • Additional Supplies:
    • Fairy lights
    • Press on vinyl lettering
    • Paint Pens to draw or write
    • Krylon Crystal Clear Coating (for use if there is art applied on the outside of the ball).
    • Ornament Hangers
    • Ribbon

Instructions

Pour the alcohol ink into the ornament and turn the ornament in different directions to create an abstract design. You can let the ink flow naturally or use the compressed air to force it into different areas of the ball. It is ideal to let the inks dry completely before applying the clear medium or the white acrylic paint.

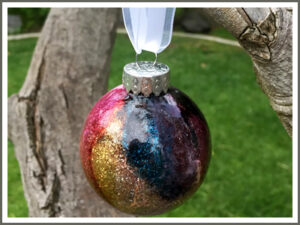
Once you are happy with your creation you can leave it as is or add glitter or an opaque background.

Glitter – After the inside has dried, apply an even coat of your clear Liquitex Medium/ModPodge to the entire inside of the glass ball. This step can take a little time as you slowly move the ball to get the entire area covered. Once covered pour in your glitter. Cover the opening with your thumb and shake the ball to ensure the glitter reaches all areas. Turn the ball upside down into a cup to drain excess glitter and medium. Shift the ball occasionally to ensure all the glitter does not slide to one spot. Allow to dry before reattaching the cap.

White Acrylic Paint – To really make your design pop, use white acrylic paint to cover the inside of the ball. Turn the ball upside down in a cup to drain excess paint. Shift the ball occasionally to ensure all the paint does not pool to one spot. Allow to dry before reattaching the cap.

Alcohol Ink Ornament Class with Danna Phalen